
Integrate Check Point Firewalls and Multi-Domain Server with Cisco ISE 2.4
- John Fleming

- Mar 12, 2020
- 9 min read
Updated: Mar 26, 2020
Integrate Check Point Firewalls and Multi-Domain Server with Cisco ISE 2.4
How to integrate Check Point Firewalls and Check Point Multi-Domain Server with Cisco ISE 2.4 and Active Directory using permissions based on Windows User accounts and Check Point Roles
In medium and large enterprises, network teams can grow to include personnel of varying skill levels. You may want to restrict certain powerful commands to only a few members who possess a higher level of expertise. Additionally, there may be an operations team that acts as a front line when network problems arise. These team members might only need read-access to the configuration and a few diagnostic commands for basic troubleshooting to determine whether or not a problem needs to be escalated. On top of that, you may have an even smaller team that has full rights to the Check Point Multi-Domain Server, giving them full rights over all of the firewalls. This document will walk you through how to configure whether user gets full, admin-level access or read-only access to a Check Point secure gateway and multi-domain server, using Cisco ISE 2.4, Radius, Microsoft Active Directory security groups and Check Point firewall roles.
In this example we'll create permissions for a NOC user, a Firewall Admin user, and a Multi-Domain Server user.
The steps can be summarized as follows:
1. Joining ISE to the Windows Domain.
2. Create Roles on the Check Point Firewalls and Multi-Domain Server.
3. Add ISE as a RADIUS server in the Check Point GUI.
4. Configure RADIUS in ISE.
Our example topology looks like this:

I. Joining ISE to the Windows Domain
In our instance, we have a Primary Domain Controller running Server 2019. (Active Directory has already been pre-configured).
1. Log on to ISE via Internet Explorer. (In our case, it’s http://10.1.18.104/admin)
2. Click Administration > Identity Management > External Identity Sources

Then click Active Directory.

3. Under Active Directory, click Add. Enter a name for the Join Point which is the host name of the domain controller (in our case, it is “AD1DC”) and enter the domain. Then click submit.


4. Enter the username and password of an Active Directory account that has rights to join a computer to the domain and click ok. You will want to make sure that NTP is configured and operational on both the ISE server and the Server 2016 domain controller and that DNS services are operational on the network as well.

ISE will confirm if the attempt to join to the domain is successful.

5. On the Windows Domain Controller we will want to create three security groups. For this example, we will create one security group, called “CheckPointAdmins,” a second group called “CheckPointNOC,” and a third group, called “CheckPointMDS.” We’ll add individual users to these groups on the domain controller. (Later on, we will create roles on the Check Point firewall that will have different sets of commands for the CheckPointAdmins and CheckPointNOC groups, and create rules in ISE, assigning these roles and their commands to different end users, based on which user is logging on). We will also create a role on the CheckPoint Multi-Domain server and create rules in ISE, assigning commands to the MDS admin users.
6. After ISE has been joined to the domain and shows a status of operational, click the Groups menu option.

Then click “Add” and choose “Select groups from directory.”


Click the “Retrieve Groups” button

Check the three desired groups for “CheckPointAdmins”, “CheckPointMDS,” and “CheckPointNOC” and click “OK” Then click “Save.”

II. Create Roles on the Check Point Firewall
In this example, we will create one role with 50 read/write commands, called “checkpointAdmins” and we will create another role with 5 read-only commands, called “checkpointNoc”
Using putty, we will want to connect to our Check Point Secure Gateway (in our lab at 10.1.18.102) and log in with local admin credentials.

Now, we’ll want to create a role, called “checkpointAdmins.” We’ll want to give it full admin rights to the Check Point firewall.
At the command prompt, type:
add rba role checkpointAdmins domain-type System all-features
Then, for our Operations group, we will want to create a “checkpointNoc" role.
For this, we’ll want to connect to the management interface of our Check Point Secure Gateway (in our lab, it’s 10.1.18.102) and log in with admin credentials.
Once logged in, you will want to scroll down, click on the plus sign next to “User Management, and click “Roles.”

Then you will want to click the “Add” button. We’ll want to create a role called “checkpointNoc” Type this in the “Role Name” field. Then click on all the features you want available to this role and select the “Read Only” option in the pull-down menu to the top right.

Then click the “Extended Commands” tab. Check a few commands, like “Ping”, “Traceroute” and “Top,” for example. Then click “OK”

III. Add ISE as a RADIUS server in the Check Point GUI.
In the Check Point GUI, under “User Management,” click Authentication Servers.

Under RADIUS servers, click, “Add”

Enter the IP address of the ISE server (eg 10.1.18.104) and choose a Shared Secret that you will also use to configure when you log into ISE. Then click “OK”

Set the Super User UID to 0 and click “Apply.”

IV. Configure Role on the Check Point Multi-Domain Server
Next, we’ll want to configure a role on the Check Point Multi-Domain server for the admin users.
Using putty, we will want to connect to our Check Point Multi-Domain server (in our lab at 10.1.18.101) and log in with local admin credentials.
add rba role cpMDSAdmins domain-type System all-features

V. Then we’ll want to add ISE as a RADIUS server in the Multi-Domain server GUI. In our instance, we open up a browser to https://10.1.18.101 and log in.
In the Check Point GUI, under “User Management,” click Authentication Servers.
Under RADIUS servers, click, “Add”
Enter the IP address of the ISE server (eg 10.1.18.104) and choose a Shared Secret that you will also use to configure when you log into ISE. Then click “OK”
Set the RADIUS Super User UID to 0, and click “Apply.”
V Configure RADIUS in ISE.
Log onto ISE via your Internet browser.
Select Policy > Policy Elements > Dictionaries

Expand System > Radius. Then click on “Radius Vendors”


The vendor specific attributes must be added for Checkpoint, since they do not ship out of the box with ISE.
Click Add to add a new Vendor:
Dictionary Name: Checkpoint
Vendor ID: 2620
Leave the other values as default. Click Submit.

Then click the Checkpoint hyperlink.


Once it loads, click the Dictionary Attributes tab.
Click "Add."

Add these values:
CP-Gaia-SuperUser-Access
Data Type: UINT32
Direction: Both
ID:230

Make sure the box is checked that says “Allow multiple instances of this attribute to be used in a profile.”
Then click Submit. This is needed to permit the dictionary attributes to be matched by multiple authorization rules.
Then add another dictionary attribute with these values:
CP-Gaia-User-Role
Data Type: String
Direction: Both
ID:229
Make sure that box is checked that says “Allow multiple instances of this attribute to be used in a profile.”

Then click Submit
Then create a Network Device Profile for Check Point. Click Administration > Network Resources > Network Device Profiles

Click “Add” to create a new network device profile for Checkpoint. Check the “Radius” checkbox and add the Checkpoint Dictionary we created earlier.

Name: Checkpoint-Devices (or whatever you'd like)
Vendor: Other
Supported Protocols: RADIUS
Radius Dictionaries: Checkpoint

Then click “Submit”
Next, we need to add a Device Group, or device type.
Navigate to Administration > Network Resources > Network Device Groups

Click the Add Button
Call it CheckPoint-DeviceFirewall.
In the “Parent Group” pull-down menu, select “All Device Types” and click “Save.”

Next, we’ll want to add a device group for the Check Point Multi-Domain Server.
Click Add
Call it CheckPoint-DeviceMDS
Set the Parent Group to All Device Types, and click “Save”

Now we’ll need to add the firewall to the Checkpoint-Devices profile and CheckPoint-DeviceFirewall group. Navigate to Administration > Network Resources > Network Devices

Click “Add”

Add the IP address of the Checkpoint firewall and give it a name.

For Device Profile, set it to the device type of CheckPoint-Devices, from earlier. For the Device-Type, set it to CheckPoint-DeviceFirewall.

Scroll down and check the RADIUS Authentication settings and enter the same Share Secret, you entered in the Check Point GUI RADIUS section. Then scroll down and click save or submit.

Next, we'll need to create three conditions, one for the Full Admin Rights Role on the Check Point Gateway, the other for the Read-Only role we created earlier on the Check Point Gateway, and the third for the Admin role we created on the Check Point Multi-Domain server.
Click Work Centers > Network Access > Policy Elements

Expand Conditions and click Library Conditions

Click in the blank space in the editor field

Then click on the “Identity group” button and click “ad1dc External Groups” per below.

Then click in the “Choose from list or type” pull-down menu and choose “samplebusiness.com/Users/CheckPointAdmins.”

Click “Save.” Then select “Save as a new Library Condition” and call it “If-FWAdmins.” Then click “Save” again.
Then click the x on the top right corner.

Now we’ll need to create a condition for the read only NOC users.
Click in the blank space in the Editor again.

Click the pull-down menu, where it says “choose from list or type” and this time choose "CheckPointNOC.”

Then click “Save,” call it IF-Noc, and click “Save” again.

Click the x on the top right screen of the condition

Now we’ll need to create a condition for the read only Check Point MDS users. Click in the blank space in the Editor again.
Select “samplebusiness.com/Users/CheckPointMDS” and click Save

Click “Save as a new Library Condition” and call it If-MDS. Then click “Save” again.

Click the X on the type right corner of the Editor and click “Yes.”
Now we’ll need to create 3 Authorization profiles, one for each Role on the Check Point Secure Gateways (so one for the “checkpointAdmins” role, a second for for the “checkpointNoc” role and a third for the cpMDSAdmins role.
Navigate to Work Centers > Network Access > Policy Elements.
Under Policy Elements, expand “Results” and click “Authorization Profiles”

Click “Add” and call it “CheckPoint-NOC”
Set Access Type to “ACCESS_ACCEPT”
Set Network Device Profile to CheckPoint-Devices

Under the “Advanced Attribute” settings, choose Checkpoint:CP-Gaia-User-Role and set it to equal “checkpointNoc” which is the role on the CheckPoint gateway.
Click the + sign to add a second attribute.
Choose “Checkpoint:CP-Gaia-SuperUser-Access, and set it equal to the number 1. Then click “Submit”

Now, using similar steps, click “Add” and create an authorization profile for the “checkpointAdmin” role as per below:

Here, change the Checkpoint:CP-Gaia-User-Role to equal “checkpointAdmins”. Click the + sign, choose CP-Gaia-SuperUser-Access and set it equal to the number 1. Then click “Submit.”

Finally, We must create an authorization profile for CheckPoint Multi-Domain server admins. Click “Add”
Call it CheckPoint-MultiDomainAdmins and set the device profile to Checkpoint-Devices.

Under Advance Attribute Settings, set the Pulldown menu to Checkpoint->CP-Gaia-User-Role and type “cpMDSAdmins”. Then click the + sign, and set the Pulldown menu to Checkpoint->CP-Gaia-SuperUser-Access, and type 1 for its value. Then click Submit.
Now, we must define our “Authentication Policies.”
Click Work Centers > Network Access > Policy Sets.

Click the + sign under Policy Sets

Under Policy Set Name, call it “CheckPointFirewalls” Click the + sign under Conditions to add a condition.
Then click in the blank space under the editor and click the device icon
Then choose the “DEVICE Device Type” menu option.

Next to the “Equals” pull-down menu, click in the “Choose from list or type” field, and select “All Device Types#CheckPoint-DeviceFirewall” Then click the “USE” button below.

Under the “Allowed Protocols / Server Sequence” column heading, click in the pull-down menu, and choose “Default Network Access.”

Then click the “Save” button.
Then under the View column, click the right pointing caret (the'>' symbol, encircled below, to the right, in red)

Then Expand the “Authentication Policy” section.
Under the “Use” column, click the pull-down menu, and select “ad1” which is the Windows Domain Controller we joined to.

Scroll down to past “Authorization Policy – Local Exceptions” and “Authorization Policy – Global Exceptions” and Expand “Authorization Policy”

Click on the + sign (outlined here in red) to create a new rule

Click on the + sign under the “Conditions column”

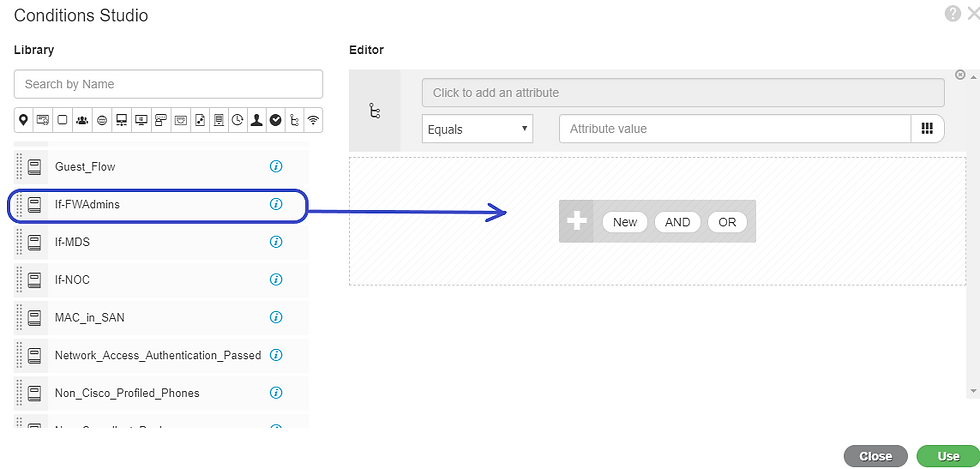
Drag the “If-FWAdmins” condition to the space underneath the editor, as indicated by the blue arrow below, and click. Then click the “USE” button
Then under the “Results/Profiles” column, click in the open box, and choose “Checkpoint-FWadmin”

Then repeat the same steps above, but for the NOC group, so the Authorization Policy looks like this:

Then click “Save”
Now, lets add the Check Point Multi-Domain Server as a device.
Navigate to Administration -> Network Resources -> Network Devices.

Click “Add”

Give it a name, the IP address, and set the device profile to Checkpoint-Devices

Then set the device type to CheckPoint-DeviceMDS

Check the box next to RADIUS Authentication Settings and enter the Share Secret. Then scroll down and click “Submit.”

Then we’ll want to navigate to Work Centers > Network Access > Policy Sets

Click the + Sign under Policy Sets

Under Policy Set Name, call it “CheckPointMDS”

Then click the + sign under Conditions.
Then choose the “DEVICE Device Type” menu option.

Under the “Choose from list or type” menu option, select “All Device Types#CheckPoint-DeviceMDS” Then click “Use.”
Under “Allowed Protocols / Server Sequence” select “Default Network Access.”

Then click “Save”
Click the arrow under “View”

Then Expand the “Authentication Policy” section.
Under the “Use” column, click the pull-down menu, and select “ad1dc” which is the Windows Domain Controller we joined to.

Scroll down to past “Authorization Policy – Local Exceptions” and “Authorization Policy – Global Exceptions” and Expand “Authorization Policy”

Click on the + sign to create a new rule
Click on the + sign under the “Conditions column”
Drag the “If-MDS” condition to the space underneath the editor, as indicated by the blue arrow below, and click. Then click the “USE” button

Then under the “Results/Profiles” column, click in the open box, and choose “Check-point-MultiDomainAdmins”

Then click “Save.”
Now you can see, there are two custom policy sets: 1 for the Firewall Devices, and 1 for the MDS.

Now, on the Windows server, place one user in the CheckPointAdmins group another user in the CheckPointNOC group, and another user in the CheckPointMDS group. Have the CheckPointNOC and the CheckPointAdmin user log on to the Check Point Security Gateway management interface. The user in the CheckPointAdmins group should have full rights, while the user in the CheckPointNOC group should just have read access. The user in the CheckPointMDS group is the only user that can log into the CheckPointMDS server.


Comments